

How To Create Smoke In Flash
Realistic Flash Smoke Effect

Category: Adobe Flash Tutorials
Added: 04/13/2007
Views: 322,007
Realistic Smoke Effect in Adobe Flash
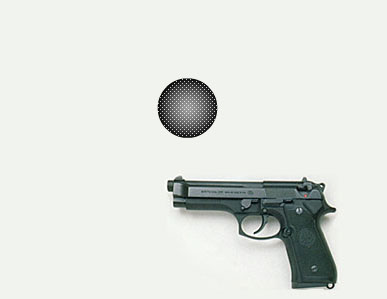
We will create a realistic smoke effect in Adobe Flash using Actionscript. After completing this tutorial, you will be able to easily adjust the smoke effect with key variables. This tutorial will create the dynamic smoke effect below:
Required Resources
Download the source image below:

Step 1 : Document Setup
Open Adobe Flash and Modify the Document Properties.
Modify > Document
Size: 390 x 300 (The image dimensions)
Frame Rate: 30 fps
Step 2 : Import Image and prepare for the effect.
Import the supplied gun.jpg onto the Stage.
File > Import > Import to Stage...
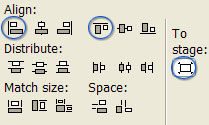
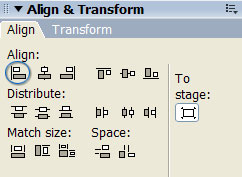
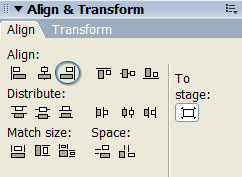
With the image selected use the Align Pane to position it on Stage. Make sure the "To Stage" button is down, then click the two align options below:
Window > Align
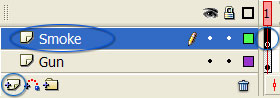
In the Timeline Pane, rename 'layer 1' to 'Gun'.
Step 3 : Smoke, one puff at a time.
We are going to create one puff of smoke and later, with actionscript, we will duplicate it over and over to make the overall effect.
Create 1 new layer by clicking Insert Layer,  .
.
Rename the new layer 'Smoke', see below:
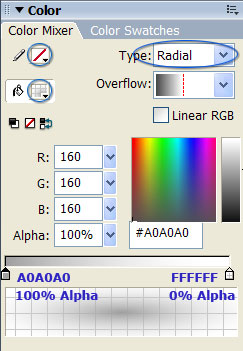
Open the Color Mixer:
Window > Color Mixer
Change to the following settings:
Make sure you have Frame 1 of the 'Smoke' layer selected. Select the Oval Tool,  , and while holding down Shift click and draw a circle on stage.
Open the Info pane:
Window > Info
Make the width and height 60 pixels.
This is a single puff of smoke. Changing this shape will dramatically change the effect. Have fun with it later.
Step 4 : Smoke goes back and forth.
Smoke tends to look better when it drifts back and forth rather than straight up. This step will make our puff of smoke travel left and right with shape tweening. Skip this step if you don't care about the drifting.
Make sure you have the puff selected and then convert it to a Movieclip with a Linkage identifier:
Modify > Convert to Symbol
Name: aPuff
Registration: center
Linkage: check
Indentifier: aPuff

Now we are going to make the puff of smoke wave back and forth.
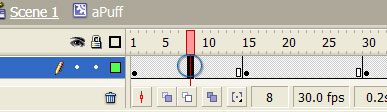
Double Click the new Movieclip on Stage. Select frame 60 then insert a keyframe:
Insert > Timeline > Keyframe (F6)
Now insert additional keyframes at 15, 30 and 45.

Click frame 15 and align the puff to the left edge:
Skip keyframe 30 and click frame 45 and align the puff to the right edge:
Now the tweening. Click in between frame 1 and 15:
In the properties pane, select Shape tweening.
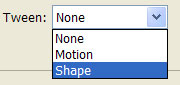
And set easing out to 100. This will gradually slow down the smoke as it reaches the outer most point. ( For realism sake )
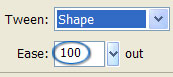
Click between frame 30 - 45, set tween: shape, easing: 100 out.
Click between frame 15 - 30, set tween: shape, easing: -100 IN.
Click between frame 45 - 60, set tween: shape, easing: -100 in.
Your puff timeline should now be all light green. Click Scene 1.

Save and Test run your current progress. You should see a single puff on stage moving back and forth:
Control > Test
It's almost time for Actionscript to take over. Good thing too, I'm tired of taking screenshots. =)


Step 5 : Lots of puffs will create Smoke!
You should be on the main timeline. Delete, yes delete the puff of smoke we just created from the stage. Don't worry it is still in the Library waiting for our actionscript to call on it.
Create a new empty Movieclip
Insert > New Symbol...
Name: theSmoke
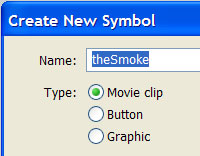
This empty Movieclip will contain our Actionscript and all the puffs of smoke. Click on Frame 1 of the new Movieclip Timeline and open the ActionScript Window.
Window > Actions
Enter the following code: ( Explained in my comments )
// ------------------------------------------------
// Realistic Smoke Effect - www.pixelhivedesign.com
// ------------------------------------------------
fadeSpeed = 1; // Smoke fade speed.
floatUpSpeed = 2; // Smoke float up speed.
// Every frame attach a puff of smoke.
this.onEnterFrame = function ( ) {
// Get next available depth.
d = this.getNextHighestDepth ( );
// Attach a puff of smoke.
aPuff = attachMovie ( 'aPuff','aPuff'+d,d);
// Set initial scale to 10%.
aPuff._xscale = aPuff._yscale = 10;
// Put puff where the mouse is. (add small random)
aPuff._x = Math.random ( ) * 5;
// Randomizes the starting animation for realism.
aPuff.gotoAndPlay ( Math.round ( Math.random ( )*20 ) );
// Smoke will animate each frame.
aPuff.onEnterFrame = function ( ) {
// Scale smoke up.
this._xscale = this._yscale += fadeSpeed;
// Fade smoke.
this._alpha -= fadeSpeed;
// Smoke floating up.
this._y -= floatUpSpeed;
// When smoke is 100% scale, remove it.
if ( this._xscale >= 100 ) {
this.removeMovieClip ( );
}
}
}
Go back to Scene 1.
Open the Library and drag an instance of theSmoke Movieclip onto the stage.
Click and drag it to the end of the gun.
Save and Test your file. You should see the full blown... smoke effect.
Realistic Flash Smoke Effect : Concluding Statements
Now that the smoke effect is working, start playing with some of the parameters. Begin with adjusting the fadeSpeed and floatUpSpeed variables. Make small and gradual changes, test, and then get into the inner code for further customization. It's amazing how little changes can completely alter the effect.
Feel free to send Comments, Questions, and other inquires using the contact page. I hope that you enjoyed the "Realistic Flash Smoke Effect" tutorial. View more of my tutorials here.
Like My Work?
I am a professional freelance web developer & graphic designer. These tutorials are a small sample of what I'm capable of. Check out my client portfolio and feel free to contact me. Whether it's a full blown database driven web application or simply a flashy banner design, hire a professional.
Project Sample
![]() Constructicons
Constructicons
Informational Website
Construction Company based in Florida
Testimonials
"Our organization relies on Pixel Hive Design�s broad-based expertise in web, graphic, and database design. Simple web sites, interactive atlases, custom Google Maps applications, brochures, interpretive panels�Pixel Hive Design has helped us to deliver wide-ranging, high quality products that always exceed clients� expectations. Max is extremely talented and a great partner."
- Stephen Engle, Director, Center for Community GIS
View More Testimonials
More Tutorials!
How To Create Smoke In Flash
Source: https://www.pixelhivedesign.com/tutorials/Realistic+Flash+Smoke+Effect/
Posted by: howellproself.blogspot.com
0 Response to "How To Create Smoke In Flash"
Post a Comment